

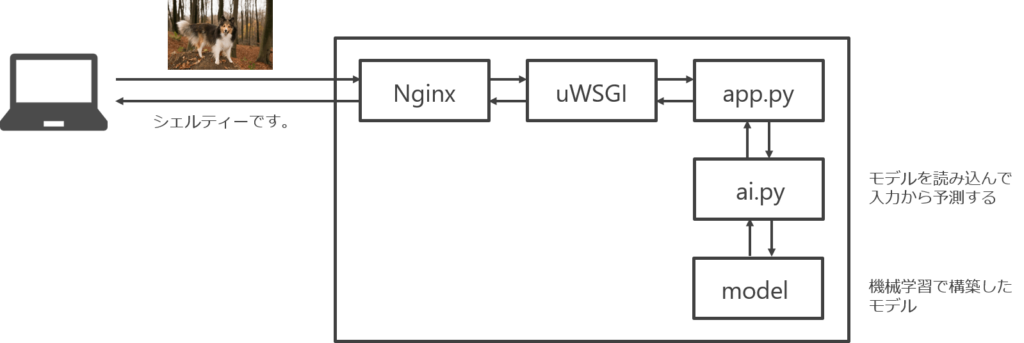
上記記事で作成したシェルティー判定 AI を Flask に組み込んでみます。
構成
Vagrant で構築した ubuntu 上で実施しました。
IP は 192.168.33.31 です。
~/python/api
├─app.py
├─ai.py
├─model                        : 事前に作成したモデル
│  ├─model_predict.json
│  └─model_predict.hdf5
├─static
│  ├─favicon.ico               : ファビコン(任意)
│  └─style.css                 : スタイルシート
├─templates                    : 画面テンプレート
│  └─index.html
├─images                       : アップロードされた画像を格納するディレクトリ
└─uwsgi.ini                    : uWSGI の設定ファイル
イメージ
アプリケーション配備先を用意する
$ mkdir -p ~/python/api
$ cd ~/python/api
$ python3 -m venv api
$ source api/bin/activate
# ai の実行に必要なライブラリをインストールする
$ pip install werkzeug
$ pip install numpy==1.16.2
$ pip install sklearn
$ pip install tensorflow
$ pip install keras
$ pip install matplotlib
$ pip install pillow
画面
ファイルがアップロードされたら、アップロードされた画像と判定結果を表示するようにしました。
bootstrap を読み込んでちょっと装飾しています。
{% extends "layout.html" %}
{% block content %}

<div class="container">

  <div class="m-5">
    <H1>シェルティー判定AI</H1>
  </div>

  <div class="m-5">
    <p>シェルティーかどうか判定します。画像をアップロードしてください。</p>

      <form action="/upload" method="post" enctype="multipart/form-data">
        <input type="file" id=image name="image" accept="image/png, image/jpeg">
        <button class="button" type="submit">submit</button>
      </form>
  </div>

  {% if img_url %}
  <div class="m-5 box">
    <h3>画像</h3>
    <img src="{{ img_url }}">
    <h3>判定結果</h3>
    <p>{{ judgment }}</p>
  </div>
  {% endif %}

</div>

{% endblock %}
<!DOCTYPE html>
<html lang="ja">
<head>
<meta charset="utf-8">
<meta http-equiv="X-UA-Compatible" content="IE=edge">
<meta name="viewport" content="width=device-width, initial-scale=1">
<link rel="stylesheet" href="https://stackpath.bootstrapcdn.com/bootstrap/4.3.1/css/bootstrap.min.css" integrity="sha384-ggOyR0iXCbMQv3Xipma34MD+dH/1fQ784/j6cY/iJTQUOhcWr7x9JvoRxT2MZw1T" crossorigin="anonymous">
<script src="https://code.jquery.com/jquery-3.3.1.slim.min.js" integrity="sha384-q8i/X+965DzO0rT7abK41JStQIAqVgRVzpbzo5smXKp4YfRvH+8abtTE1Pi6jizo" crossorigin="anonymous"></script>
<script src="https://cdnjs.cloudflare.com/ajax/libs/popper.js/1.14.7/umd/popper.min.js" integrity="sha384-UO2eT0CpHqdSJQ6hJty5KVphtPhzWj9WO1clHTMGa3JDZwrnQq4sF86dIHNDz0W1" crossorigin="anonymous"></script>
<script src="https://stackpath.bootstrapcdn.com/bootstrap/4.3.1/js/bootstrap.min.js" integrity="sha384-JjSmVgyd0p3pXB1rRibZUAYoIIy6OrQ6VrjIEaFf/nJGzIxFDsf4x0xIM+B07jRM" crossorigin="anonymous"></script>
<link rel=stylesheet type=text/css href="{{ url_for('static', filename='style.css') }}">
<link rel="shortcut icon" href="{{ url_for('.static',filename='favicon.ico') }}" />
<title>シェルティー判定AI</title>
</head>
<body>
{% block content %}{% endblock %}
</body>
</html>h1 {
background: #dfefff;
box-shadow: 0px 0px 0px 5px #dfefff;
border: dashed 1px #96c2fe;
padding: 0.2em 0.5em;
color: #454545;
}
.box {
padding: 0.5em 1em;
margin: 2em 0;
border: double 5px #4ec4d3;
}プログラム
app.py で画像がアップロードされたら画像を保存し ai.py にファイルパスを渡し,判定結果を取得します。
# -*- coding: utf-8 -*-

from flask import Flask, render_template, request, redirect, url_for, send_from_directory
from werkzeug.utils import secure_filename
import numpy as np
import os
import ai

app = Flask(__name__)

SAVE_DIR = "./images"

app = Flask(__name__, static_url_path="")

@app.route('/')
def index():
    return render_template('index.html')

@app.route('/images/<path:path>')
def send_js(path):
    return send_from_directory(SAVE_DIR, path)

@app.route('/upload', methods=['POST'])
def upload():
    img_file = request.files['image']
    if img_file:
        file_name = secure_filename(img_file.filename)
        file_path = os.path.join(SAVE_DIR, file_name)
        img_file.save(file_path)
        judgment = ai.predict(file_path)
        return render_template('index.html', img_url=file_path, judgment=judgment)
# -*- coding: utf-8 -*-
from keras import models
from keras.models import model_from_json
from keras.preprocessing import image
import numpy as np
import sys
import os
from keras.preprocessing.image import ImageDataGenerator, load_img, img_to_array, array_to_img
def predict(img_path: str):
# モデル保存先
MODEL_ROOT_DIR = './model/'
MODEL_PATH = os.path.join(MODEL_ROOT_DIR, 'model_predict.json')
WEIGHT_PATH = os.path.join(MODEL_ROOT_DIR, 'model_predict.hdf5')
# カテゴリ
CATEGORIES = [u'シェルティー', u'コーギー', u'ボーダーコリー']
# 画像サイズ
IMG_SIZE = 150
INPUT_SHAPE = (IMG_SIZE, IMG_SIZE,3)
# モデルを読み込む
model = model_from_json(open(MODEL_PATH).read())
model.load_weights(WEIGHT_PATH)
# 入力引数から画像を読み込む
img = image.load_img(img_path, target_size=INPUT_SHAPE)
x = image.img_to_array(img)
x = np.expand_dims(x, axis=0)
# モデルで予測する
features = model.predict(x)
if features[0, 0] == 1:
return u'シェルティーです。'
else:
for i in range(0, len(CATEGORIES)):
if features[0, i] == 1:
return u'シェルティーではないようです。{}です。'.format(CATEGORIES[i])サービス起動
# Nginx を起動する
$ sudo systemctl start nginx
$ vi uwsgi.ini
# uWSGI を起動する
$ uwsgi uwsgi.ini
[uwsgi]
wsgi-file=app.py
callable=app
http=0.0.0.0:8000
socket=/tmp/uwsgi.sock
chmod-socket=666シェルティー判定 AI アプリデモ
http://192.168.33.31 にアクセスして動作確認しました。
簡単に AI を Web アプリに組み込むことができました。